The Middle Region
The Middle region of Timberline’s side country lies just west of the Magic Mile and the Stormin’ Norman lifts.
Kruser Ridge
This is not an official name. It’s just a nickname for the slightly higher ground immediately west of the Kruser trail. As soon as you leave the Kruser trail, you are out of bounds. This is where most of us have made our first tentative steps out of bounds, keeping within reach of the Kruser trail — or what used to be called the Blossom trail before the trails were renamed into Kruser and Paintbrush. Don’t go very far west. Ski parallel to the Kruser trail and pretty soon start turning left, reconnecting with the Kruser trail. This is just a short excursion, but surprisingly it is less skied these days than slopes a bit farther west.
The Mountaineer Trail / Timberline Cabin
There are no visible trail markings here, but all you have to do is traverse westward from the top of Stormin’ Norman, past just a few trees until you get to a wide open meadow with a canyon-like depression on skier’s left. Enjoy skiing that meadow down toward a solitary dead tree in the middle of a relatively flat area. The remnants of the old Timberline cabin are located under the snow just a few yards east (left) of that dead tree. Remember that the original Blossom trail actually started from this spot, from the cabin.
Skiing down from there, you should soon start noticing yellow ribbons on trees, and other yellow markings. These are all reminders that you have reached the safety boundary, your last chance to get back to the lifts. Start turning left and traversing at this point, following the yellow ribbons.
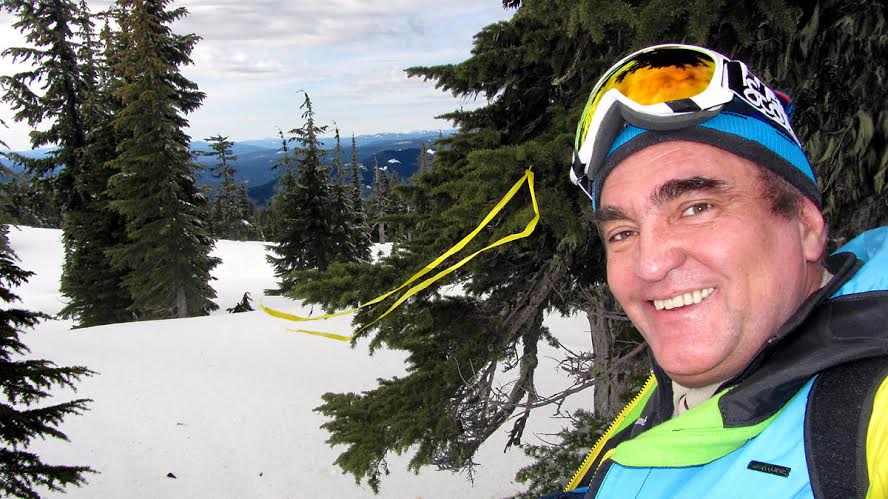
Even if you lose sight of the yellow markings, keep traversing left, back to the lifts. If you go any lower than those markings, you will not be able to easily get back to the lifts without climbing. Go lower down only if you intend to eventually connect with the Glade trail and ski to Government Camp.
If you follow the yellow signs and ribbons, you will emerge onto the Kruser trail. You can then simply follow Kruser to the bottom of the Jeff Flood Express. But, if the Jeff Flood lift is closed (as it tends to be in late Spring, after the Palmer lifts starts running regularly), simply continue traversing and you will eventually get to the bottom of the Stormin’ Norman lift.
Sand Canyon
Sand Canyon begins as 2 separate branches which soon merge into one. Both branches start off very gently. At first they don’t even look like canyons at all. If you have learned to recognize the location of the Mountaineer trail meadows and the dead tree on flat terrain marking the vicinity of the old Timberline cabin ruins, then Sand Canyon is the first depression in the ground west of that.
Unfortunately, there is no way to ski into Sand Canyon and return to the lifts. Sand canyon starts too low on the mountain, so by the time you are fully in it, you just don’t have enough elevation to bring you back to the lifts without some climbing.
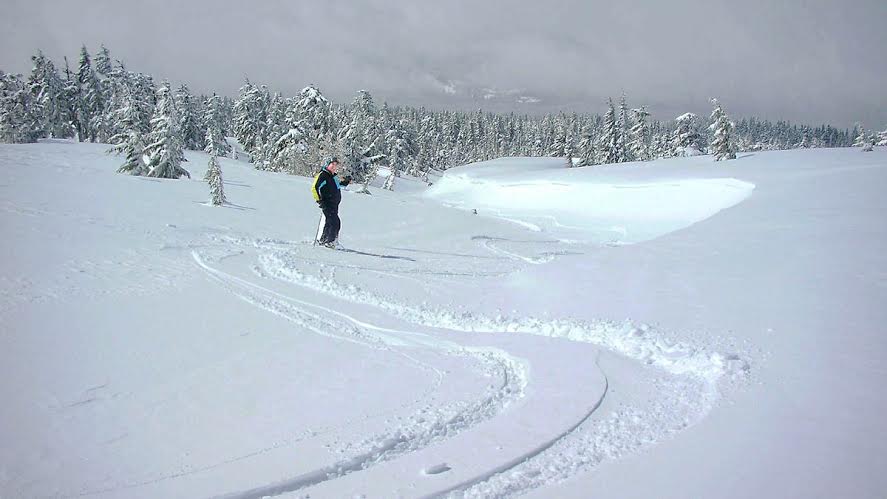
But Sand Canyon is an interesting way to ski down to Government Camp. It’s not perfect, but it’s interesting. Don’t go there if there is a foot of fresh snow on the ground. The slope is simply not steep enough to push you forward, so you would have to work hard to make progress. But in the spring, when the snow has settled into a firm base, you can get just enough speed to playfully go up and down the sidewalls of the canyon.
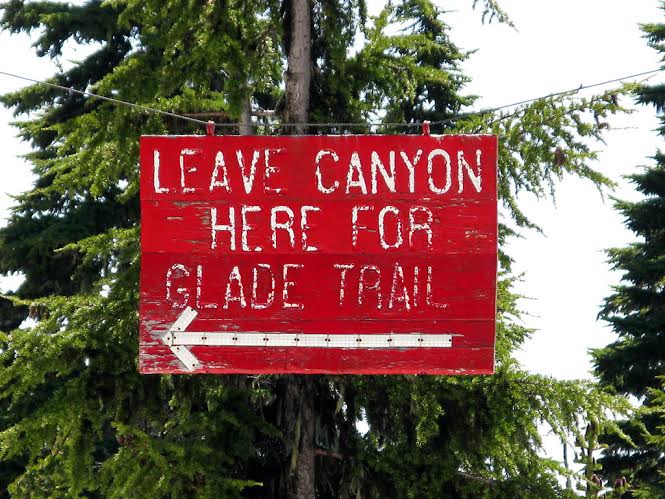 Sand Canyon is the safest of the 3 canyons to ski, because it is the only one that has an informative safety sign suspended above the canyon on a cable strung between two trees. The large orange sign says in white letters: “Leave canyon here for Glade Trail.” Unfortunately, the white lettering on this sign has been rapidly fading in the last couple of years. The last two words “Glade Trail” are almost impossible to read any more. On top of that, some irresponsible vandals have partially covered up the sign by throwing sneakers over it and also some sort of sheet or blanket that now partially obscures the sign.
So, the sign might not be self-explanatory any more. But just know that if you find an orange colored board suspended above the canyon, that is the place to get out of it, climbing up a slope on your left.
When you exit Sand Canyon, simply follow a diagonal clearing in the forest. Notice that this clearing heads almost directly toward Mt. Jefferson – your guide to safety. After about a mile (or less), you will emerge onto the Glade Trail, at a point almost exactly half way between Timberline Lodge and Government Camp, and marked by a wooden trail sign. Follow the Glade Trail from there, and you will end up safely in the middle of Government Camp.
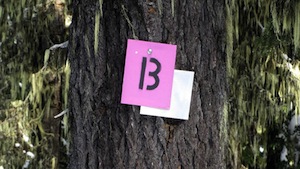
For enhanced safety, and for the sake of those who are not coming out of Sand Canyon but are skiing through the trees in the area between Sand canyon and the Glade trail, there is also a series of red and pink markings alerting you to the RED boundary, the place to turn left in order to get to Government Camp. Going beyond the red markings in a definite no-no. It will result in a very long hike down the mountain. If you just keep going downhill, you will eventually emerge somewhere onto Kiwanis Camp Road (Road 39), but it will take you several hours to get there, and you will need to cross a fairly wide stream several times. If you get lost in that area in the afternoon, chances are you will not make it out of the forest before nightfall. So, observe the RED boundary.
Unfortunately, many of the red and pink ribbons in that area have faded away over the years. A few painted markings on tree trunks remain, but they are not bright red and might be hard to spot. So, until those safety markings are improved, it might be safest to ski down Sand canyon down to the suspended orange EXIT sign, and then familiarize yourself with the diagonal cut through the forest heading toward the Glade trail, so you can recognize it if you later arrive there from a different direction.
Little Zig Zag Canyon
Little Zig Zag Canyon is accessible from the top of the Magic Mile. It’s easier to get here from the Palmer lift. But, if the Palmer lift is closed, you can traverse to Little Zig Zag canyon from the top of the Magic Mile. The entrance to the canyon is almost at the same level as the upper station of the Magic Mile. So, don’t lose any vertical. If possible, as you traverse west, try to climb up a step each time to push forward and side-step slightly uphill.
It’s worth the traverse because it is fun to ski Little Zig Zag, as George Yun shows us here:

Due to prevailing winds coming from the West, the western side of Little Zig Zag Canyon is almost always heavily corniced, and you cannot exit the canyon in that direction. But the east side of the canyon is swept clean by the wind and you can easily exit almost anywhere. The problem arises only when the snow gets blown away or melted away, exposing the rocks. At that point, you need to pick your exit carefully, to avoid the rocks.
Skiing Little Zig Zag is usually quite easy. The snow at the bottom of the canyon is protected from the wind, so it is usually smooth, even when everything else around it is wind-blown. The only potential obstacles might be chunks of the corniced lip that fell down and rolled to the bottom.
Exiting the canyon is easy. Simply point your boards toward the left edge of the canyon and you will gradually traverse out of it.
Exit before you reach the tree-line and immediately start traversing diagonally eastward, back toward the ski area. If you traverse straight east, you can get back to the lower end of the Magic Mile lift. But if the lower lifts are still open (Stormin’ Norman or Jeff Flood), you can continue sliding down the Mountaineer trail meadow, past the dead tree and the Timberline cabin location, and emerge onto the middle of the Kruser trail, as described above.
Last modified: May 6, 2014